A HyperSnap 6 user asked me recently, how to create numbered boxes with rounded rectangles. This tutorial came out initially as an email to her, but could be useful to others as well, I think.
1.
Click File/New in
HyperSnap window to create a new image with white background.
2.
Set the “foreground
color” to the line color
![]() you
want for the rounded frame, and the line width you want
you
want for the rounded frame, and the line width you want
![]()
3.
Draw a rounded frame
the size you need with the rounded rectangle tool
![]()
4.
Change the
“foreground color” to some other color, not white (which is your background) and
not the color of your frame. I used light yellow.
5.
Select flood fill
tool
![]() and
click inside the rounded rectangle you have drawn.
and
click inside the rounded rectangle you have drawn.
6.
From HyperSnap menu
select Image/Auto Trim to trim out the rest of unwanted white background. Now
your image inside HyperSnap window will look like this:
![]()
7.
Click “Stamps”
button
![]() -
on the stamp image, not the down pointing triangle, end when “Edit Stamps”
window appears, click “New Stamp…” button.
-
on the stamp image, not the down pointing triangle, end when “Edit Stamps”
window appears, click “New Stamp…” button.
8.
“Edit Stamp” window
appears and “Image” tab in it is active. Click the “From Selection” button there
to import your rounded rectangle image to the new stamp.
9.
Click the “Test”
tab, then click the center alignment button
![]() ,
then inside the text area type number 1.
,
then inside the text area type number 1.
10.
Click the “Preview”
button at the bottom and look at how the stamp would work. If text is too big or
too small, close the “Preview” window, select the text with your mouse so that
it’s highlighted in reversed color, and click “Font” button. Set font size
larger or smaller, you may also try different fonts there. You may also set a
different font color, by default it’s black. Then click OK in the Font window
and use Preview again to make sure you like it – may any changes that are
needed.
11.
When done with text
and font, click the “Frame” tab in “Edit Stamp” window. Click the down pointing
triangle next to the background color button, select white color in the tiny
window that pops up (bottom right). Also put check-mark into “Make it
transparent” box.
![]()
12.
If you want further
adjust vertical alignment of the text, modify the “Text margins” – “Top” value –
set it larger to move text down within the stamp, or smaller to move it up. Then
use “Preview” button again to make sure it looks right, adjust as needed.
![]()
13.
Click at the filed
described as “Stamp Name” near the bottom, and change the name to something you
can easily recognize, e.g. “Round Rect Red”. Make sure that “Save stamp” option
is selected at the bottom and click OK below it.
14.
Click OK also in the
“Edit Stamps” window, and you’re done. Note that “Round Rect Red” stamp is
listed in that window now, and you may select it and click “Edit” if you ever
need to modify it somehow.
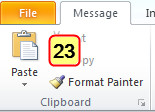
Below I used the stamp I
created writing this on a small image, changing the number on it to 23:
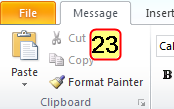
I see that the font is too
big, so I edited the stamp and made the font smaller, and adjusted “Top margin”
for the text to move the text down:
Maybe you’d like to have this
stamp with white background inside – the process would be identical, except that
you would need to start drawing this at the very beginning on a different color
background (e.g. yellow), then when you use flood fill to fill inside – fill it
with white. Then select the same yellow in step 11 to make transparent, to
remove the white corners.
To add the stamps to the
currently edited image, click again the “stamp” button in the drawing toolbar,
but this time click the down pointing triangle to the right of the stamp image,
not the image itself. A list of installed stamps appears, which now contains the
“Round Rect Red” stamp. Click this name on the list. Initially the stamp is
added at the top right corner of the image (or the selection, if you used area
select tool first). You may drag this stamp to the location you need. Then
double-click the stamp to change the text in it, e.g. the number from 1 to 2
etc. You can also edit the stamp to change text color and size easily.
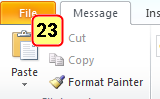
The same stamp may be used in
HyperSnap 7 – even the stamp created with HyperSnap 6 – and it looks better in
HyperSnap 7, e.g. the text is smoother:
You could also create other
stamps, e.g. round shapes or elliptical – the process would be identical.
Greg